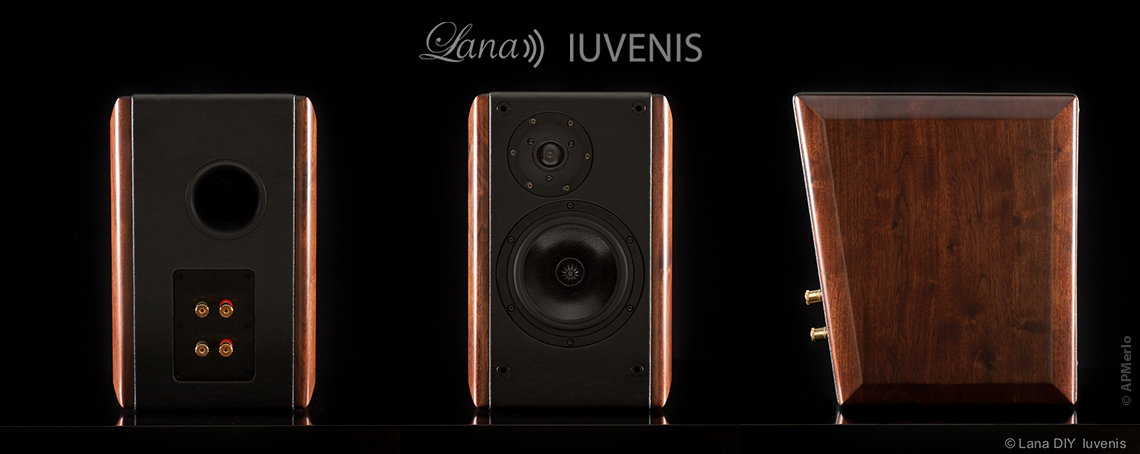
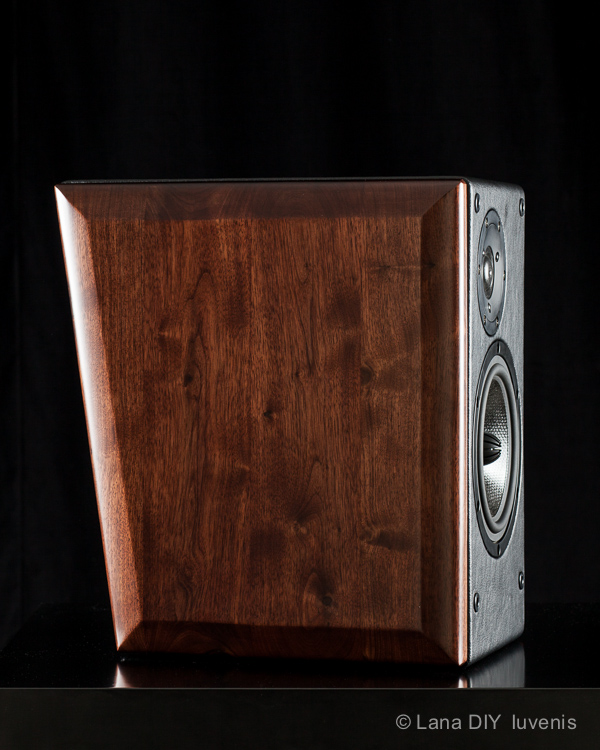
LANA IUVENIS
A speaker that will give you a great listening experience!
Iuvenis is capable of a very “natural” musicality with detailed reproduction and well defined sound stage and also has a great capability to follow music dynamics and nuances. All the components used (drivers, capacitors, coils, resistors, cable, binding posts…) are of the highest quality in the market, the cabinet is made with attention to be extremely rigid and deaf to the vibrations that can corrupt the quality of sound reproduction.
Iuvenis is a 2 way stand-mount speaker system with a 7-inch woofer in a 15,9 net liters box, a very good compromise between size, costs and performance and also of nice look in a domestic environment. They really can be the all you need in rooms of 10 to 40 m2. Moreover the box of a stand-mount speaker it’s more easy and “affordable” to make for a DIY enthusiast. After a long period of testing and listening sections the Iuvenis loudspeaker is now available for people that like to listen to music at high quality and also for who like to make their own DIY speakers.
– You can read more about the Iuvenis sound at the bottom of this page –
Project and Photos by Andrea Paolini Merlo © – Cabinetmaker: Tibor Szeifert
The Iuvenis is available as:
- Assembled (internal crossover version): 1.650,00€ per pair excluded Tax (cabinet with massive American Walnut on the 2 sides, MDF 3 cm tick and black synthetic leather)


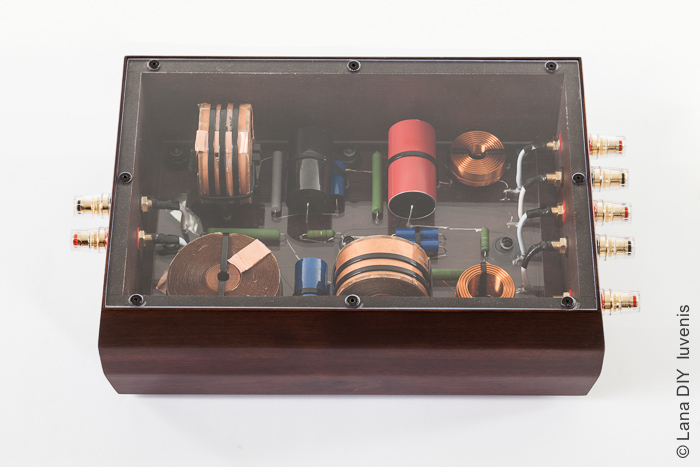
LANA IUVENIS – DIY Loudspeaker – Cabinetmaker: Tibor Szeifert
LEFT: Iuvenis version with Internal Crossover. RIGHT: Iuvenis version with External Crossover. Click to enlarge
Basics Characteristics:
- 2-way vented speaker system
- Eton 7” mid-bass
- SB Acoustics Satori 1,14” soft dome tweeter with 2 part aluminum faceplate with integrated mechanical decoupling
- System sensitivity: ~87 db/2.8v, 1 meter
- 15,9 net liters vented cabinet (virtually ~17.5 liters)
- Frequency resp.: 38/45 – 30.000 Hz (-6/-3db) – Typical in-room response ~39 Hz (-3db)
- Acoustic point of crossover: 1600 Hz – Electric point of crossover: 2200 Hz
- Impedance: 8 ohms, minimum 7 ohms at 180 Hz
- Suggested for rooms of size: 10 m2 to 38 m2 (107 / 646 ft2)
- Suggested power: 25-150 watts RMS amplifiers
- Cabinet made with 3 cm tick MDF and Bitumen pads are installed in all internal panels
- Internal Woofer Cut-out is made with “Flower Shaped” cut to reduce rear diffraction
- Edges of cabinet are rounded to reduce baffle diffraction
- Sides of cabinet are made with 2,8 cm thick American Walnut wood
- Bracing is used to strength even more the cabinet structure
- All crossover components are decoupled from the board to reduce vibrations
- Kimber 4 PR or Supra PLY 3.4 cables are used for internal cabling
- All internal and external connectors are Golden plated
- All soldering are made with Mundorf or Jantzen Silver Solder
- More kinds of damping materials are used to reach a better control of the internal reflections
- Weight: 17 Kg for each cabinet!
THE DRIVERS
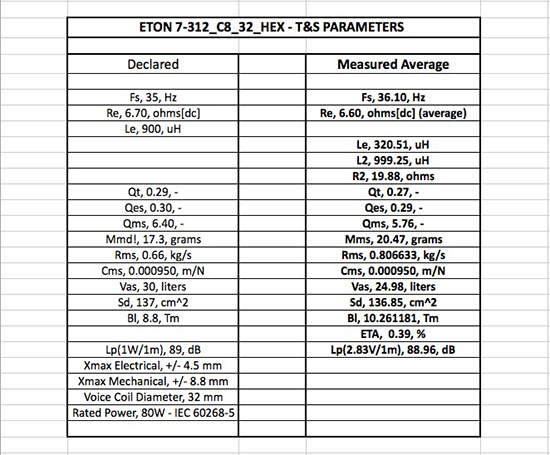
Woofer Eton Symphony II 7-312/C8/32 HEX
Tweeter SB Acoustics SATORI TW29RN-B


The Eton drivers have a very high quality construction that brings a very precise, natural and transparent sound. Not least it’s capable to give an authentic spatial representation, a joy to listen to. Everything is well designed and takes in consideration all different aspects to reach a great balanced result with very good transients. The dynamics, precision and clarity in the low and middle range is more then superb. The reproduction stays very controlled and of quality even at high levels. Listening to records like the Telarc The Rite Of Spring (Cond. Yoel Levi) in my 17 m2 listening room is simply impressive and you don’t miss “anything”. But don’t forget to position the speakers and your listening position in the room carefully to achieve a good acoustic result (and with some room acoustic treatments)! 🙂 The 2 Eton Symphony II 7-312/C8/32 HEX don’t come as matched pairs but the measurements results of the 2 units are really very close to each others. Of the 4 units tested just one had a more relevant difference then the others in the 1900/2200 Hz region but with the crossover cut this difference became very small in the final response. This prove a very high standard construction. The only thing to note is that with the crossover you have to take care of the break-ups peaks over 3000 Hz. These make the crossover “more complicated” and a bit more expensive. These break-ups are there also at the off-axis response and so we should take care of them.
The SB Acoustic is one of the most exciting speaker brand in the market, great quality, knowledge and superb sounding drivers. The SB Acoustics SATORI TW29RN-B is simply excellent technically and acoustically, the on axis response is very flat and the break-up at the high frequencies are very controlled. Great is also the off axis response behavior and the harmonic distortions are good. Very good technical solutions are used like the two part aluminum faceplate with integrated mechanical decoupling. Dual balanced compression chambers to improve the dynamic. Dual copper caps to get a minimum voice coil inductance and phase shift. Neodymium motor with T-shaped pole piece to get lower distortion. 700 Hz low resonance frequency that gives a very extended range and more. The sound is detailed but not disturbing, the sound stage is superb and shortly I would say that this is a driver that you “don’t notice” because of its very good musicality behaviors. The Satory has a very good power handling (voice coil diameter of 29mm) and considering that it has a sensitivity of 96 db and that it’s attenuated to match the average speaker sensitivity, the Tweeter will not be under serious pressure also at high level listening. The electric crossover point of 2200 Hz it’s managed extremely well by the TW29RN-B.
Measures of Drivers Impedance and T&S Parameters


LEFT: Comparison of the Measured Impedance of the 2 Eton Woofers (Click to enlarge). RIGHT: Comparison of the Measured Impedance of the 2 Satori Tweeters (Click to enlarge)
–
MEASURES OF THE IUVENIS SPEAKER SYSTEM
Before you start reading the measures please read Measurements!


LEFT: Measure at 1 m distance with Mic at Tweeter high at center of the baffle. The acoustic response is shown with Baffle Diffraction loss
that cause a reduction of SPL in the low frequencies (this happens to all speakers). When the Speaker is placed in the room the lower frequencies will
get a „boost” in a quantity that depends on the room sizes and characteristics and on the placement of the speaker, that’s why the Baffle Diffraction Loss will be partially recovered, generally we can assume about +3/4db (very simply speaking).
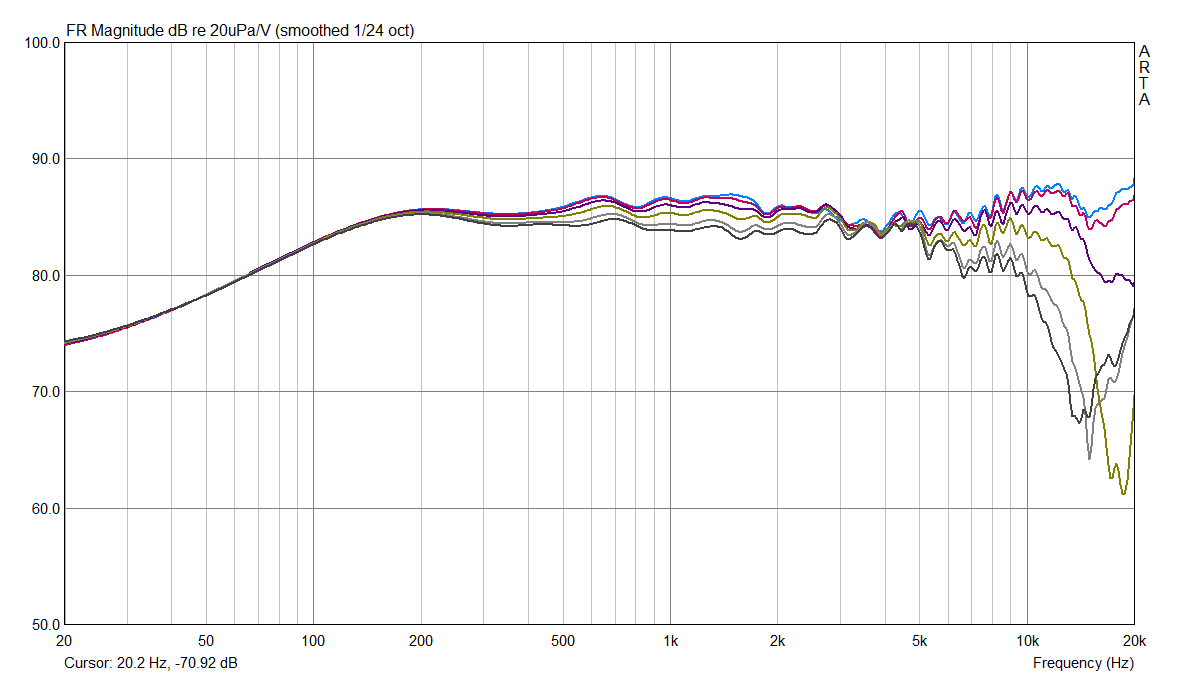
The Response here is without Polyurethane and Foam in the Vent. The response is +/- 1 dB from about 80 Hz to 2.800 Hz and +/- 2 dB from 58 Hz to 30.000 Hz. (Click to enlarge) RIGHT: Impedance response of right and left speakers, which is nicely similar. The electrical Phase is +/- 20 deg from 150 Hz to 30000 Hz. The higher phase variation is – 66 deg at 74,30 Hz, as the impedance in this region is 21,24 ohm, there will be no problem for any amplifier to drive the Iuvenis in the entire frequency range. (Click to enlarge)


LEFT: Measure at 1 m distance with Mic at Tweeter high at center of baffle. The measure is gated and accurate from 350 Hz and above.
In Green the response with the tweeter connected to the „normal” crossover output of 0 dB and in Black connected to the +1 dB output. (Click to enlarge) RIGHT: To get the +1 dB response with the External Crossover you need to bridge the tweeter output negative terminal with the red terminal located next to it (here on the right side) and marked „+1”, as shown up here. To bridge the 2 terminals use the given golden metal bridge. (Click to enlarge)


LEFT: Measure at 1 m distance with Mic at Tweeter high and at center of the baffle. The acoustic response between the right and left speakers is very
similar showing a great match. Purple is the Rigth and Black is the Left speaker. The response is Gated and is reliable from 350 Hz up. (Click to enlarge) RIGHT: Response of the A Cabinet (with less Rounded Baffle and side panels) and of the B Cabinet (with more Rounded Baffle and side panels). It’s interesting to see how this can influence the on axis response (and also the off axis). All panels used in the 2 pairs of Iuvenis have the same thickness and the drivers used in the test were all the same (to avoid any possible differences caused by different drivers). (Click to enlarge)


LEFT: Measure at 1 m distance with Mic at Tweeter high at center of baffle. The measure is gated and accurate from 350 Hz and above.
In Blue the response at 0 deg and in Green at -45 deg, on the side where the tweeter is closer from the edge of the baffle. (Click to enlarge) RIGHT: Same kind of measure: in Blue the response at 0 deg and in Dark Grey at +45 deg, on the side where the tweeter is more far from the edge of the baffle. (Click to enlarge)

LEFT: Measure at 1 m distance with Mic at Tweeter high at center of baffle. The measure is gated and accurate from 350 Hz and above.
At 0 -10 -20 -30 -40 -45 degrees, side where the tweeter is closer from the edge of the baffle. (Click to enlarge) RIGHT: Same kind of measure but at 0 +10 +20 +30 +40 +45 degrees, side where the tweeter is more far from the edge of the baffle. (Click to enlarge)


LEFT: Cumulative Spectral Decay Waterfall of final speaker set to -35db and not Smoothed, Microphone is at 80cm distance. Click to enlarge RIGHT: Same but Sonogram representation. From 1.500 Hz up the -35 db is mostly reached in 1.60ms or less, which is an excellent result that shows very few Reflections. The middle high and high frequencies are going down extremely fast, at 0.95ms or less we are down to -35 db, tweeter shows a very fast decay! The lower middle region is, as usually, slower but very good reaching -35db for the first time in around 2ms from 500 Hz and up, there are some coming back Resonances (of low entity) that goes again to -35db in around 3.5ms. Click to enlarge
We can see that there are not dangerous resonances here and the response gets down quickly specially from 1000 Hz up. As the measure is Gated to avoid my room reflections, there are missing data for the low frequencies.
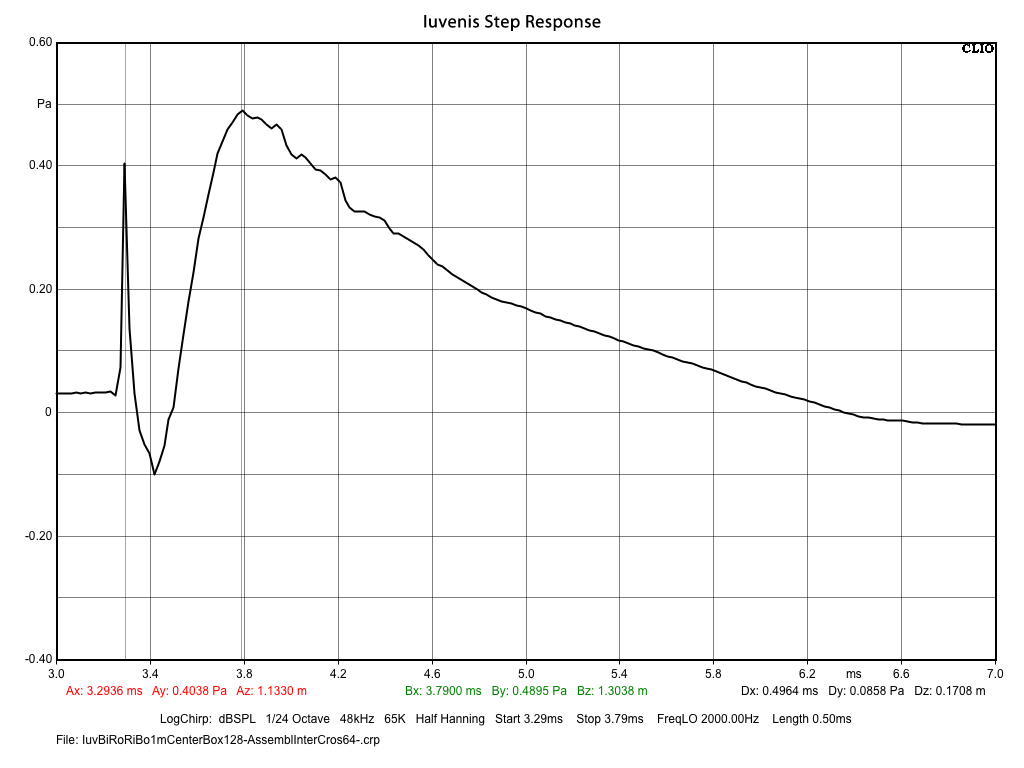
Step Response of the Iuvenis, the Woofer is delayed of 0,47 ms from the Tweeter

Impulse Response of the Iuvenis. The Impulse get down to -40 dB in 1.0 ms, then there is 1 very small peaks that reach -38 dB and at 1.25 ms (from the start of the Signal) the Impulse is definitely under 41 db. A very good result!
THE CROSSOVER
— EXTERNAL VERSION! —
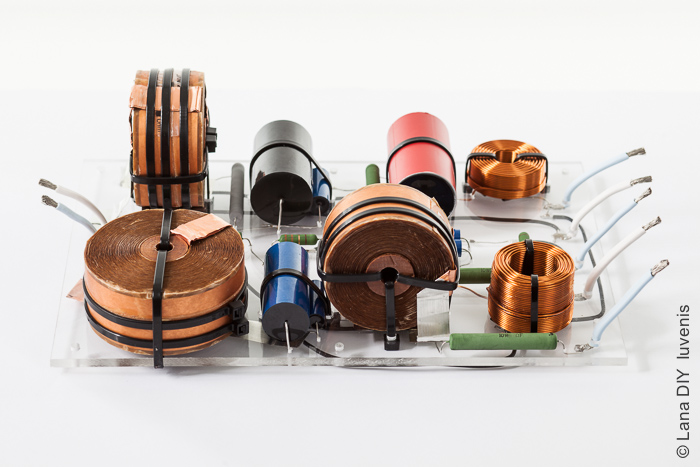
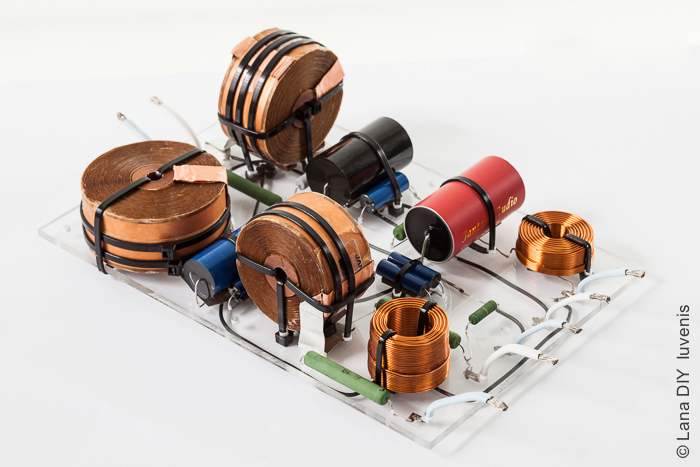
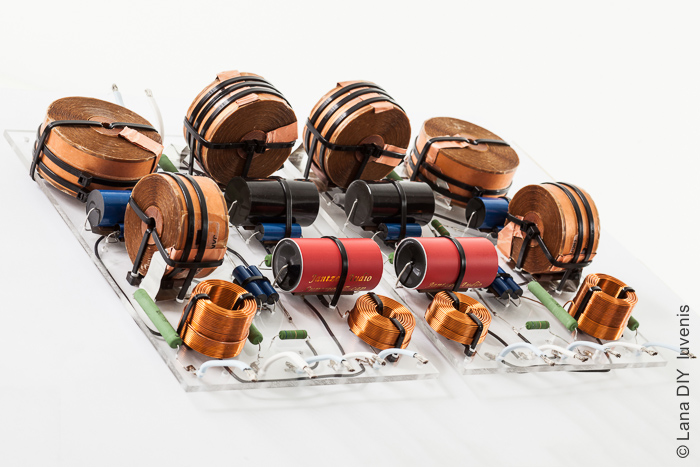
Photos of the “final” crossover, external version – Click to enlarge
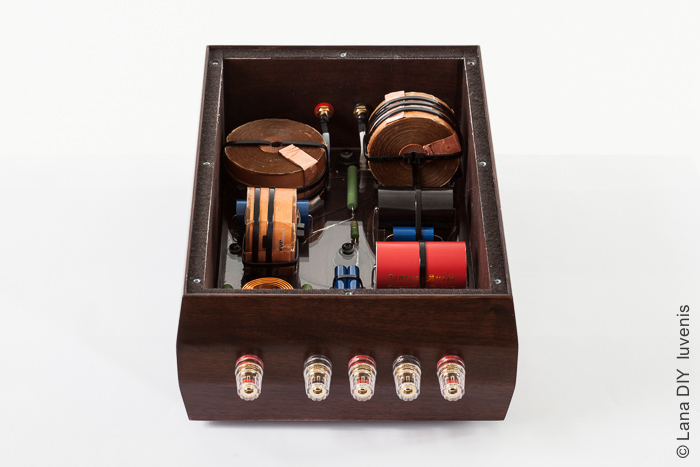
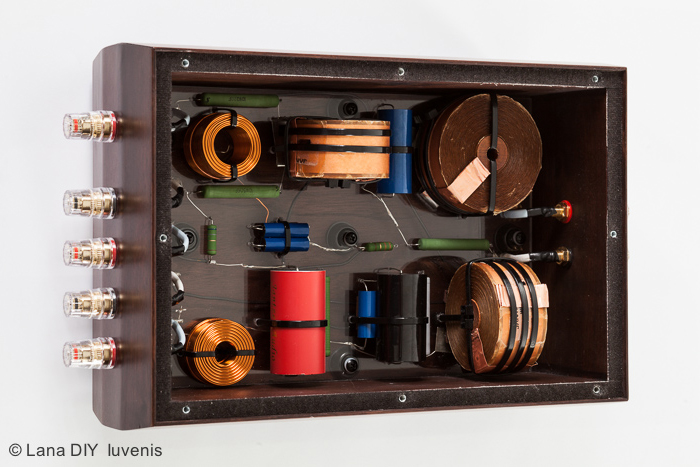
Photos of the “final” crossover inside the external case made of American Walnut – Click to enlarge
— INTERNAL VERSION! —
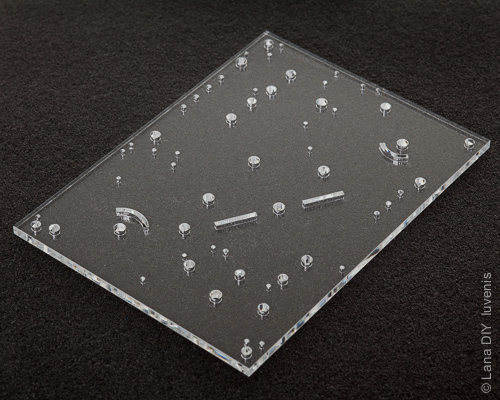
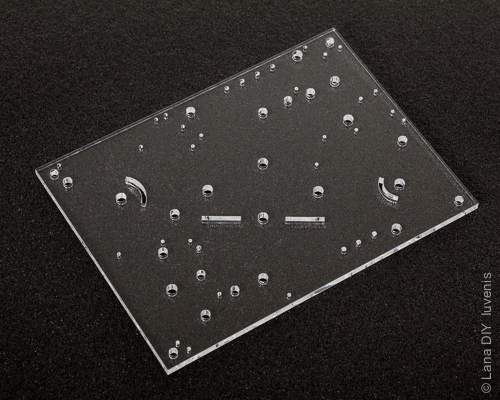
Photos of the internal version of the crossover plate not yet assembled. This is the plate used if you want to have the crossover inside the cabinet. The technical drawing is available in dwg or pdf format and it can be sent to any Plexiglass company that will cut for you the plate in the right size and with all the cut-outs for the components. Then you will just need to assemble the components on the plate. (note: in the internal crossover I use the Mundorf CFC 14AWG coils instead of the Jantzen Waxcoil 14AWG because the Mundorf ones have smaller sizes and for the internal crossover, due to the small space available, this is a very important aspect! These Mundorf coils have also a bit lower Rdc then the Jantzen ones)
Here under an example of some of the documents available for who will purchase the DIY Iuvenis project:

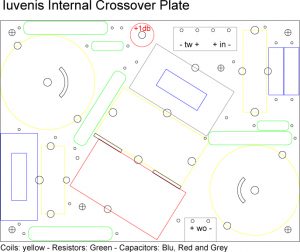
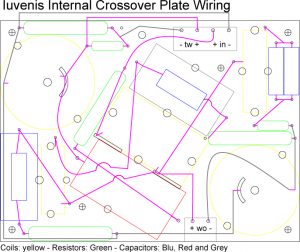
LEFT: Vectorial file in dwg or pdf with the plexiglass plate size and all cut-outs. CENTER:Disposition of the components. RIGHT: Wiring of the components, all the connections are placed under the plate. The 6 holes with the + sign inside the circles are the holes for the screws used to fix the plate inside the cabinet. I always place a soft material between the cabinet and the crossover plate to reduce vibrations, like Felt or Packaging Foam of about 5 mm thickness.


Photos of the Internal Crossover assembled. All coils and capacitors, to try avoid the vibrations coming from the cabinet, are decoupled from the 5mm tick plexiglass with a tick rubber. The resistors are “decoupled” and fixed using Blu tack kind material, that it’s also resistant to heat, though just 1 resistor can get “kind of hot” and just at long very high listening level. Of course you can use also Glue Gun or similar but I don’t like to use glue. Between the plexiglass and the speaker cabinet you should use felt or some rubber material to reduce more the vibrations coming from the cabinet structure. – Click to enlarge
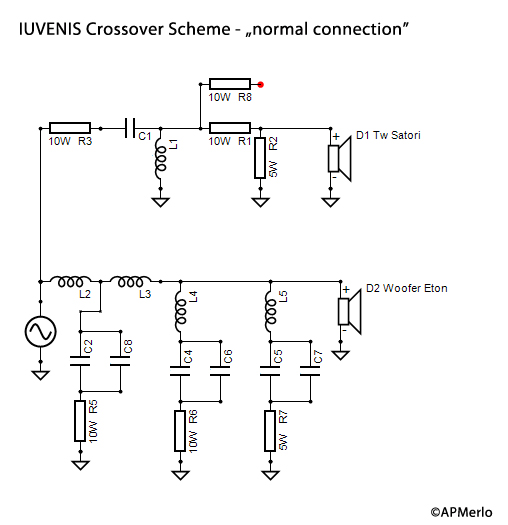
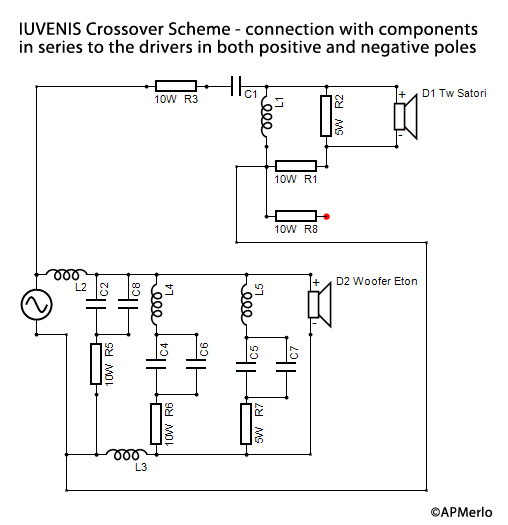
THE CROSSOVER SCHEME
At the end, after many measuring and listening tests, I got to this “final” crossover that I believe is suitable to have a correct sound, a realistic stage reproduction and good general characteristics in a domestic environment. The off-axis measurements of the acoustic response and phase were taken with the drivers alone and also with the crossover connected. The measures where made horizontally and vertically from 0 to + 180 deg and from 0 to – 180 deg., in steps of 10 deg. and in some cases of 5 deg., with some limitations caused by my non Anechoic environment. These many information helped a lot and sad a lot to what we should take care and helped to verify certain acoustical behaviors during the listening sections. Power Response, Directivity Index, Listening Window (+- 30 deg. hor. +- 10 deg. ver.), drivers Acoustic Phase behavior and Impedance Magnitude and Phase were all taken in consideration. (It’s not all about to get a straight line in the on-axis response)
“Sound is Art and Science, it is not just a question of personal taste. By knowledge and experience we will be able to evaluate which are those speakers systems that are better then the others and that sound well and correctly. On these results we all should quite agree and then between these good speakers we will choose the one that better suites our “way/taste of listening”, depending also on our room, electronics, kind of music…”
Don’t be scare, this is NOT a complicated crossover, parallel capacitors and 2 more resistors are used to get a precise and “good sounding” crossover. The 2 schemes are the same for components values and characteristics. The one on the left is with the components connected in the “normal” way (no any component is in series with the drivers on the negative pole). The one of the right is with components also connected in series to the drivers on the negative pole. The C2-C8, C4-C6 and C5-C7 are in parallel to reach very exact values, the second Capacitor (which is always of low µF value!) it will cost you just a little bit more, no worries.
Crossover short description:
- Usually I use to put components in series to the drivers in both positive and negative poles, I personally did not test if the musical results are better in this way then in the “normal” connection way but experienced experts did these tests that proved some small improvements in sound resolution. It seems to be a bit more amplifier “friendly”. So why not to use this kind of configuration after all, but you can go also for the “normal” connection, no problems at all! Note that to use this type of solution is reasonable only if you use high quality drivers and components or you will never hear any differences.
- Tweeter has an electrical 12db/oct crossover cell that from the acoustic crossover point and down reaches a 16 db/octave acoustic slope. Before the cell there is a single resistor and after the cell a L-pad resistor circuit to attenuate the driver level and also to increase the impedance of the driver to better match with the woofer impedance (SB Satori used is a 4 ohm driver, the Eton is 8 ohm). Connecting the R8 resistor (facultative!) in parallel to the R1 will give a + 1 db response on the higher frequencies starting gradually from 3500 Hz up (also 1400 – 1700 Hz will rise a bit). I personally prefer the solution without the R8 resistor connected but the fine tuning on the higher frequencies is personal and depends on room, electronics and genre of music. It’s possible to change the values of the R3, R1 and R2 to fine tune the speaker to your needs but need to be done carefully not too change too much the phase tracking between Tweeter and Woofer in the crossing frequency region. If you want to get help on how to change the values then feel free to contact me (go to Contact section 🙂). All resistors used are Superes.
- The Eton Woofer mounted on the baffle had a rising around the 1000 Hz (this happen to all drivers mounted on a baffle) and I needed to compensate this to get a smooth linear response in the middle frequency region. This task was achieved with the RLC that is right after the cell and also choosing the right values to the electrical 18db/oct cell. With this RLC circuit I also “reduced” the frequencies over 500 Hz to compensate the Baffle Step losses in the low frequencies, but just a little. The Eton is a greatly sounding and build driver but it has some main peaks (on-axis and off-axis) above 3500 Hz, and mainly the one at 3550 Hz has to be definitely flattened down. This task is taken by the second RLC circuit and the values of the components of this RLC have to be very exact to get a precise tuning. The Woofer cell is an electrical 18db/oct configuration and together with the RLC circuits will give a 14 db/octave acoustic slope from the point of crossover up to 3400 Hz and a ~20 db/octave acoustic slope over 3400 Hz. Using these solutions I was also able to keep the acoustic phase between the 2 drivers well aligned from ~300 Hz to ~3300 Hz.
Please note that 2 pairs of Iuvenis were made and tested with 4 different pairs of the drivers: Cabinet A and Cabinet B. Also the A Cabinet were made with less rounded edges and the B Cabinets were made with more rounded edges (mainly on the sides of the box: baffle and Walnut panels), this last one (B Cabinet) produced a better on axis response in the 5300-6000 Hz region. The shown graphics are mostly of the A Cabinet (where you will notice the 1 db dip at 5300-6000 Hz on axis) and in some cases the B cabinet. In The Measures section there is a graphic that shows the on axis different responses between the 2 Cabinets.

LEFT: Simulated SPL response of speaker and of individual drivers with Crossover, 1/24 oct. The response under is with Baffle Step losses! RIGHT: Phase tracking between Woofer and Tweeter with Mic at 1 meter at Center of Baffle 5 cm under Tweeter axis. The phase of the woofer at 3000-4000 Hz goes more far from the tweeter phase because of the action of the RLC at 3550 Hz. Cabinet A. (Click to enlarge)
![]()
It is very important also to check the way the Phase tracking changes at different angles and distances, here you can see how the phase tracking will look like at a possible listening distance. Here the listening position (microphone) is at 2 meter, 7 cm under the Tweeter (which is my suggested listening ear level!) and at 10 degrees from the speaker, speaker itself has a toe-in of 10 degrees. This is the location where the person is sitting during listening at his ear level. 🙂
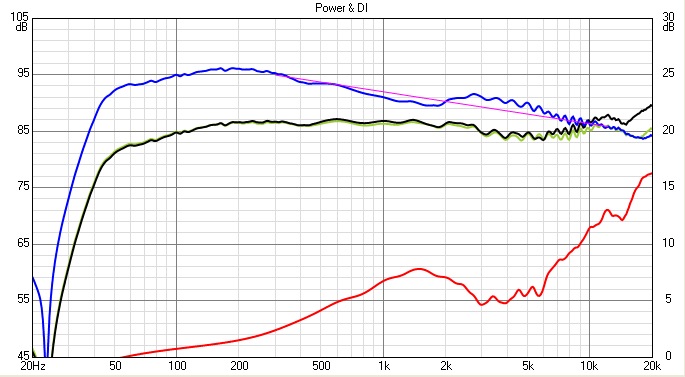
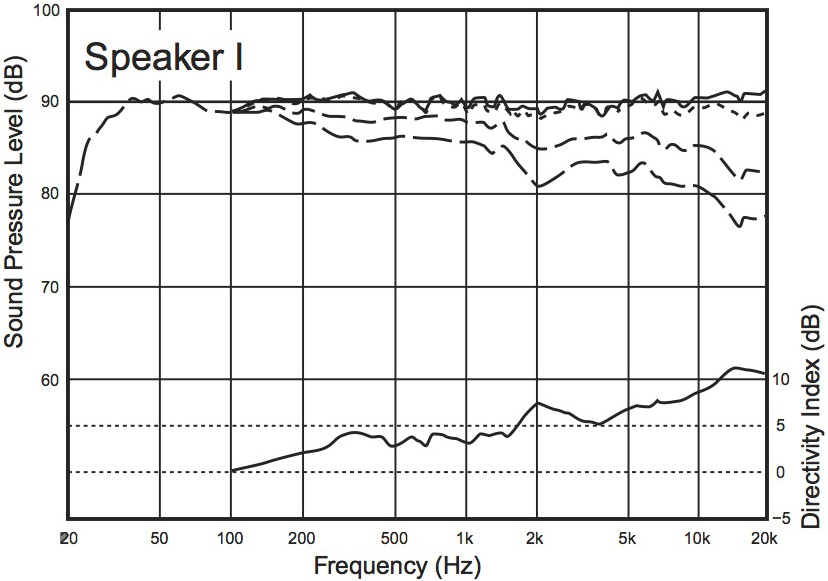
LEFT: Simulated Power Response, SPL, Listening Window (+-30 Hor. +-10 Ver.) and Directivity Index, 1/24 oct. The graphic is scaled in a way to better match the graphic on the right for easier comparisons. (The measures where taken horizontally and vertically from 0 to + 180 deg and from 0 to – 180 deg. in steps of 10 deg.) Cabinet A. RIGHT: As comparison the measures made on a speaker that was highly appreciated during several blinding tests (Harman Studies). From up: On Axis, Listening Window, Early Reflections, Power Response and Directivity Index. A general “smooth” response between the different measures is what we are looking for. The Speaker on the right has a smoother DI transition (3500-5000 Hz) but a deeper dip in the PR around 2000 Hz, in any case these 2 graphs shows a good general behaviour that can predict a “balanced” sound. Also we get good informations that will HELP us in how the speakers will interact with the listening room and what to take care of during their positioning. About Directivity Index please see under note. (Click to enlarge)

LEFT: Polar Map Directivity, horizontal. RIGHT: Electrical Impedance and Phase that shows that the Iuvenis is a easy speaker to drive for any amplifier. (Note that in this measure it wasn’t used the final Vent length) Cabinet A. (Click to enlarge)
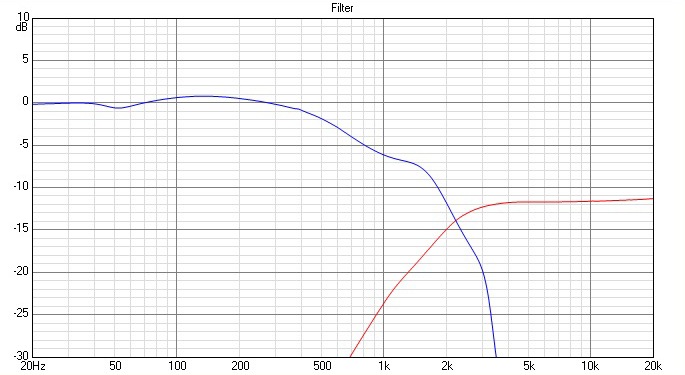
Filter gain of individual drivers.
The IUVENIS simulations were made with VituixCAD, a fantastic application, very powerful and complete! To list here all the features of this great application I would need all the space I have available! 🙂 You can click on the above link to read all about this application. VituixCAD is made by Kimmo Saunisto and it’s continuously updated and improved, just fantastic!!! Thank you Kimmo…
Directivity Index: The DI shows very well the directivity transition between Woofer and Tweeter (that is usually more critical in a 2 way speaker), where at the crossover point the woofer (specially bigger sizes ones) starts to get more directive then the Tweeter (that has wide directivity). In this crossing region, because of the increasing directivity of the woofer, we will have a decreasing of “power response” in the off axis responses (on axis not), more we get off axis and more it will decrease. In this way in the decreasing region the interaction with the room and all the reflections we get at the listening position are much less preeminent then it would happen with a wide directivity driver. And the Tweeter will behave exactly in the opposite way and from the crossover crossing point the frequency region reproduced by the Tweeter will have a wide good directivity and it will interact with the room much more and all the reflections we get at the listening position are more preeminent then it happen with the Woofer. Luckily the crossing between the 2 drivers is happening gradually and in this way the directivity change can be more smooth and less audible, of course it’s still there. 🙂
Now there are constructors and DIY projects that uses Waveguides (some times huge ones) mounted on the Tweeter to reduce the Tweeter Dispersion and in this way to better match with the woofer, ok this is a possible solution and it is a “room friendly” solution and of course not just the only good solution, it’s one (“new”) approach as others and I respect that. But what I think is that drivers Manufacturers were and are doing all they can to make drivers with very good general characteristics, and one of these is to have great dispersion, as to have it is a GOOD thing for a driver and it gives a great listening ambience experience if well used. I don’t think that to restrict it is the best thing to do, we limit our Drivers to compensate the limitations of our listening rooms. Instead it wouldn’t make more sense to acoustically treat your listening room? A treated room will control (decrease) the walls sealing and floor reflections and the reverberation time of the room, in this way the reflected sound of the rooms will be much less and much more controlled. And Bass traps on all the corners will DRASTICALLY improve the sound under 400 Hz which will not anymore “cover” the rest of the sound. You will ear things that you never heard before!
Every usual domestic rooms have quite serious acoustic problems that will limit your music quality experience, this is for sure, and still the most of the “Audio File” people I know spent several thousands of euros for a connection cable! But NOTHING on any minimal acoustic room treatment, doesn’t make much sense! And sometime without even taking much care of the speakers, listening point and furnitures positioning. About the 14% of the sound you hear at your listening position is coming directly from the speakers, all the rest is coming from the room in a reflected way, so in most cases you are listening more your room then your speakers. But if you really don’t want to do anything with your room then limit your speakers. 🙂
Several times I hear people saying that this or that Tweeter is not sounding good if the crossover point is too low (around 2000 Hz), but if crossed at 4000 Hz it will and of course this can be true… but are we really sure that is the Tweeter that don’t perform well in that region? Or maybe the crossing with the woofer could be made with more attention? Or our not acoustically treated listening room is the cause of “such a bad performance” of the Tweeter
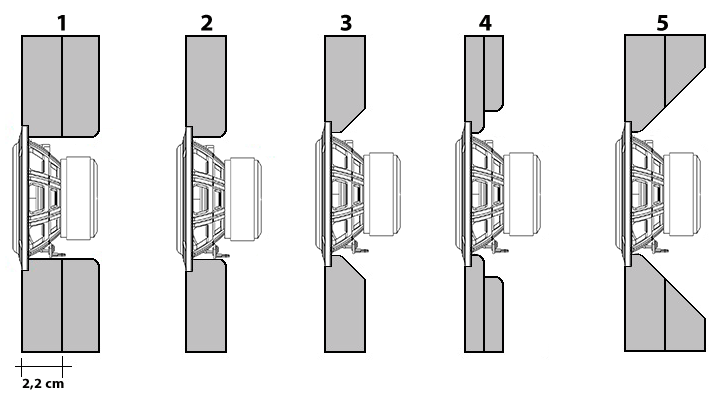
THE CABINET

Iuvenis Loudspeaker System Cabinets Drawings. (Click to enlarge) If you want you can reduce the MDF panels thickness but really DON’T go lower then 2,2 cm! And in this case you can make some reinforcements long all the internal edges with Wood Strips.
On the 2 sides panels we used Walnut Wood of 2,8 thickness, if you prefer you can also use MDF panels and finish them as you better like.


Iuvenis Loudspeaker System Baffles Drawings. (Click to enlarge) – All the cut outs were made using a Milling Machine (CNC), our “Flower Cut” was made using WoodWOP 6.1 (woodWOP is the CNC programming system of the HOMAG Group) and I can send the files by email. If you need more info just write me an email. Click on the “Iuvenis Assembling Of Cabinet Gallery” link here under to see Photos.
Please note: It’s not a must to make the Flower cut or a second circular bigger cut in the inside of the box, you can also make just 1 cut of ∅ 15,15 cm if this is more simple for you, but then the Woofer will be partially obstructed at the back from the panel and this will cause some reflections that coming back (out of phase) to the cone of the driver can degrade a bit the sound quality. The thicker the Baffle the more we have to care about this problem and to have a tick baffle is very important, as at the Baffle is where the most of the driver’s energy goes, and with thinner Baffles vibrations will occur and will be transmitted. You can also Chamfering the back of the circular cut if this is more simple for you, see under for comments on this solution.
The 4 MDF panels (front, up, back and bottom panels) are externally covered with black synthetic leather.
IUVENIS ASSEMBLING OF CANINET GALLERY – click on it!
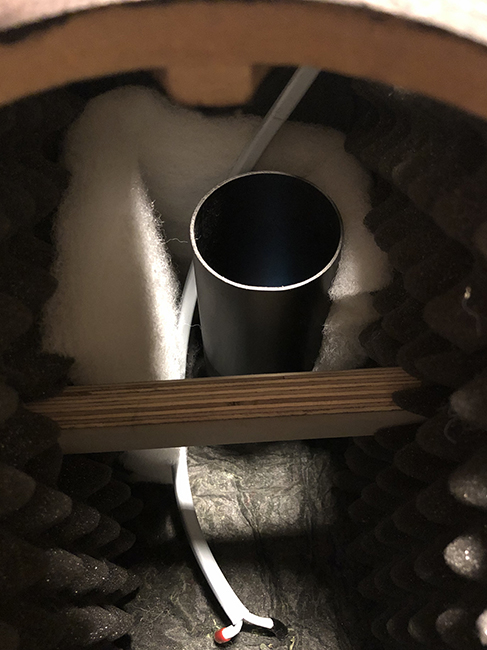
Back of the Baffle! Few Thoughts:

As we can see:
- the “1” is not good, here proportions are for a 4 inch driver, and the back cut will work also as a very short Transmission Line that will interact with the frequency response.
- the “2” is still not very good with a 22mm baffle and a small driver. Rounding the inside edge of the round cut is a good idea.
- the “3” is Chamfering the back and it’s a good compromise as it’s fast to make it and it’s better then “closing” the back radiation of the driver, you can use also this solution on the Iuvenis as Baffle is not too thick. But it starts to work as a short Waveguide and it may brings some other “problems” (probably very small in this case, I didn’t make tests). Please note that what I am writing here it’s discussed by professional engineers. I never saw this solution to be used in Commercial speakers, if they do use some kind of solution to reduce the back “reflections” is not with Chamfering (see Dali solution on the far right photo).
- the “4” is what I usually do, on the left the round cut is the needed cut out for the driver and on the right the round cut has a bigger diameter. The left round cut should be at least 16mm deep for a 4 or 5 inch driver, and at least 19mm for a 6-7 inch driver. In this drawing having an MDF Baffle thickness of 22mm and a 4 inch driver, it can be: left round cut 16 mm deep and right round cut 6 mm. (As the thickness of the left round cut is 16mm – 5mm of the mid-woofer basket= 11 mm thickness, it can be a good idea to use screws with matching drive-in nuts to fix the driver to the baffle)
- the “5” I think you shouldn’t use it, as here we will create a serious Waveguide to the back of the driver. But I believe it’s still better then the solution “1”.
- on the far right you see the back Cut Out used by Dali in one of their Loudspeakers, I think this is a great solution and this is what I get with the Flower shaped cut mentioned above.
- Note: BUT I have to say that I see several tests of good commercial loudspeakers (mostly not too expensive ones!) that uses MDF or HDF panels of 19 – 22 mm thickness (with 6-7 or 8 inch drivers) and with normal Cut Out for the drivers (I mean no Chamfering or other solutions), and still with no serious coloration in the response and with good/very good CSD (cumulative spectral decay) results. They usually have the proportions between the dimensions of the box well though, bracing pieces to reinforce the cabinet, good positioning of the drivers and the right damping material inside the cabinet. Let’s not forget that if we use a 22 mm tick Baffle and the basket of the mid-woofer is 7 mm thick then we will have “just” 15 mm at the back of the driver, and this is not a too dangerous thickness, reinforcing inside the cabinet with bracing (and or with Bitumen Boards) will help keeping the all cabinet stiff. Good to keep all this in mind! 🙂 But I still prefer to give more “freedom” at the back of the driver when using a MDF tick 2,5 cm or more for the Baffle.


Iuvenis photos showing the Damping material disposition inside the cabinet. Contact me to get all the information about the dampening materials used and quantities.


LEFT-CENTER: 1 cm tick Polyurethane pieces rolled inside the Vent. RIGHT: 0,7 cm tick Acoustic Foam pieces rolled inside the Vent.
VENT TUNING
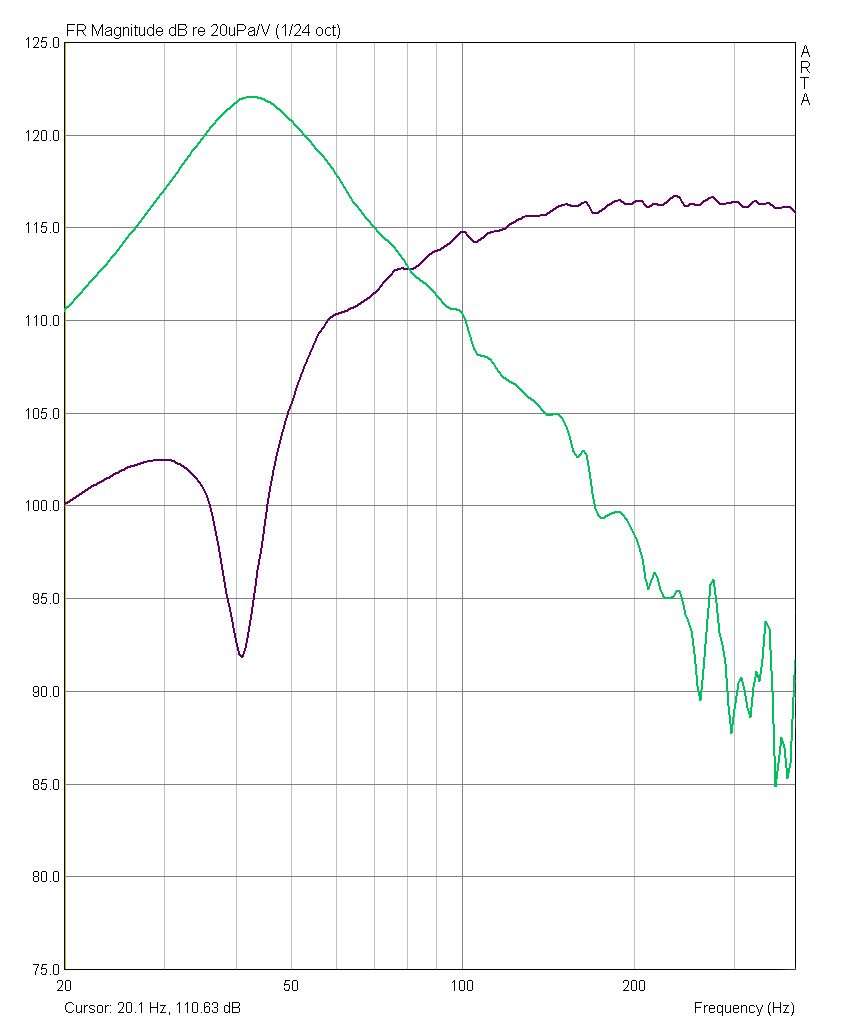

LEFT: The measure show the Vent Tuning at 41 Hz (F3 45 Hz) with a Flared port that has ∅ 6,8 cm in the outer side and ∅ 5,7 cm in the inner side, the length is 22 cm (Jantzen Port Model #900018 that has a length of 22 cm, no need to cut it), but it’s intended to be used with a Polyurethane piece or a Acoustic Foam piece inside the Vent to achieve the “right result” in the low end reproduction in my listening Room. With the Acoustic piece inside the Vent we will get better transient and a more tight low end reproduction. You can also remove the piece in the vent or use a different size/thickness to better get the results you like and also to better match with your listening room. RIGHT: Here the measures were taken with the Vent length of 20 cm (as I did tests with differing tuning) and here you can see how the tuning changes using the Polyur. or Acoustic F. inside the Vent: no material inside the vent Fb 43,7 Hz, 0,7 cm tick Acoustic Foam Fb 39,8 Hz, 1 cm tick Polyurethane Fb 35,7 Hz. The Iuvenis I have is set with the Vent of 20 cm and the 1 cm tick Polyurethane inside with very good results.
This system is intended to be stand-mounted, away from the back wall. There will be some bass reinforcement if placed close to a wall, please take this in consideration when placing the speakers in your listening room.
For the Vent tuning simulations I really like to use AFW (Audio For Windows), an application developed by Fabrizio Montanucci and Gian Piero Matarazzo. The results of the simulations are always very very close to what we will get in reality! 🙂 You can read about AFW here (but all is in Italian, also the application is in Italian language), the latest version you can find it here and they are LDS and ALAB!
IUVENIS DIY LOUDSPEAKER KIT
To know all crossover values, list of components, information about the crossover assembling, wiring and to get the technical drawings of the plexiglass crossover plate in dwg or pdf please contact me (andreapmerlo@gmail.com). As there is a lot of work behind this project please note that to get these information and to assist you I ask a fee of 100,00€.
I took care and attention to many aspects to get very good overall results, hundreds of measures were taken and many listening test were made, it was a challenging experience and the result is very rewarding.
SOUND
Concerning the Sound of the Iuvenis I do my best to be objective and I write down just some of the main points. However I don’t finish a project until I don’t get the Speakers to sound very well and to be a very good and honest product to enjoy!
The Drivers deserved all the possible attention and thanks to their great quality the Iuvenis loudspeaker is extremely musical and capable to follow the greatest dynamics changes in music giving a very exciting and realistic music listening experience with NO any fatigues listening. The sound is balanced and just a bit tending to a warm listening, the middle high frequencies are not invasive and disturbing but without loosing details and precision, also thanks to the quality of the highest frequency region. For who wants a bit more “open” sound it’s enough to change the value of only 1 resistor in series to the tweeter.
(In the external crossover connecting the R8 resistor in parallel to the R1 it’s possible to open more the sound of the Iuvenis, in this way you can better match the sound to the room characteristics, music kind or to the preference of the listener. You can get the same with the internal crossover.)
The low end was tuned to achieve a good compromise between extension and precision, I wanted a “small” speaker that can cover the most of the low end region well and without feeling the need of a Subwoofer. In a domestic room we can get down to around 38 Hz at -3db. The reproduction is controlled and tight (using the Acoustic piece inside the Vent is very recommended), and capable of very good dynamic. Of course the Iuvenis is not intended to be for very large rooms, this is obvious. The middle/bass and middle frequencies we get are of great transparency and clarity showing the very good sound properties of the 3-layer Hexacone Sandwich cone (these are one of those things that NO any measures of frequency response, distortion, etc. is able to show you), and compare to the previous Eton 7-375/32 Hex model I found the sound reproduction to be more tridimensional. The transition between the Eton Woofer and the Satori Tweeter is smooth and integrates the 2 drivers well in terms of response and acoustic phase, this also helps to get a right sound stage reproduction. The small dip at 1900 Hz is given by a small dip in the Woofer response and not because of the transition Woofer/Tweeter. The Satori TW29RN-B makes a fantastic “job” and I try to let it as “free” as possible using a simple electrical 12db/oct configuration and an attenuation to match the level of the Woofer. The Tweeter is very musical, this is what express the best what I hear, the sound is very detailed and the up end is there clearly but never invasive. Matched with the Eton the sound reproduction and the quality is very rewarding. With good classical and jazz records the sound stage is very well reproduced and wide, we have a nice and precise disposition of the instruments and vocals and we can locate them well in the horizontal plane. The sense of depth is well recreated and we can feel the different distances of the instruments and vocals. The disposition in the vertical plane is fine and the instruments (like saxophone or singers that are standing) are not pushed down to a lower level but they are reproduced to a higher plane (I recommend to have the tweeter lever a bit above your ear level!).
About in room Placement!
REMEMBER that you can improve very much the general sound and the stage reproduction of your speakers if you place them very carefully in your room, and the same attention should be taken to the positioning of your listening spot. I have my room that has some limitations caused by its proportions that are a bit problematic but as I placed the Iuvenis carefully in the space I am able to get very good overall result. At the moment my room is just “partially” acoustically treated and I will make an even better acoustic treatment soon. A “minimum” of Acoustic Treatment is what ALL serious listeners should do in their room! The differences and improvements you will get with such a treatment are much more prominent then any differences you will ever get in changing cables, and in most cases more prominent then changing amplifiers or sources. The minimum you should do is to deal with all the corners of the room with good real Bass Traps. The ones made of just Polyurethane foam are ok but not the best to really deal with lower frequencies at least you have quite a “good” room, as it depends on the dimensions and proportions of it. In “every” usual sized domestic rooms you will have a very big mess in the frequency response and reverberations from about 500-800 Hz down that will contaminate and degrade all the music reproduction! You can change cables and electronics but you still will NOT be able to listen what your HI-FI equipment can really give you. After Bass Traps also acoustic panels should come! 🙂
Iuvenis general positioning suggestions (but experiment in your room):
- Tweeter axis should be at around 100 cm high from floor. In this way the sound stage will not be pushed down and it’s more realistic
- Seat in a way that your ears level is about 5 cm under the Tweeter level (but experiment)
- Baffle of the Iuvenis should be placed far from the back wall (which is properly called Front Wall), something between 70 and 120 cm (distance measured from the baffle to the back wall). You can go also closer and it should work well, also very close to the walls but then you should try to be far from the corners of the room, you need to make tests, really a lot depends on your room dimensions, materials used and furnitures
- Distance between center of baffle and side wall should be not less then 70 cm. 1 meter or more should work very well.
- Distance between the speakers depends also on your room and your listening distance, something between 150 to 200 cm should be fine
- I personally don’t like to listen in the equilateral position, I prefer to be more far from the speakers, I also like to have some “more ambience”
- Iuvenis has the Tweeters positioned in a mirror position, and they should be placed with the tweeters closer to the center of the room. I got the best results with this placement but you can also try to place it in the other way to see what it fits you (and your room) better
- Carpet on the floor is very recommended
- If your floor is of wood and the wood is floating then you need to decouple the stands from the floor, spikes in this case are not good
- Changing the Toe-in of your speakers can change significantly the quality of the reproduction, staging and depth of your speakers, same as the positioning of the cabinets in the room. I personally prefer not to turn too much the speakers in, my Toe-in is around 10 deg but depends also on the distance between the 2 speakers. I don’t want a “monitoring” listening, instead an “ambience” listening is what I am looking for and it’s more close to a natural Live performance. Use first a Mono record to check that the voice of the singer is reproduced exactly at center stage (or a stereo record where you know that the voice is really and always at the center). You may need to turn one speaker more in then the other and this it’s ok, when you get the right center stage you can go forward with your positioning tests. Generally if you turn more in the speakers you will reduce the horizontal plane reproduction and the depth may increase, turning more out will get the opposite results. Play with it till you get a good balanced overall result. Also keep in mind that turning more in the speakers should reduce the first reflection from the side walls (specially if you don’t have acoustic panels on your side walls). Several time people turn in quite a lot the speakers and have the listening point close to the speaker because the room is not treated acoustically, and in this way people try to reduce the first reflections and other room influences, but this is not the best solution. Treat your room instead!!!
Andrea Paolini Merlo